Page Summary
On this page we cover the features and functionality of the JADE Application Manager.
JADE Application Manager
The JADE Application Manager is where we create, edit, and ultimtely run JADE applications (JADA files). JADE applications consist of one or more plugin instances, where plugins are highly-configurable, parallel-running, communicating components. Below we show the JADE Application Manager as it appears just after launching JADE (or when creating a new application).
![]()
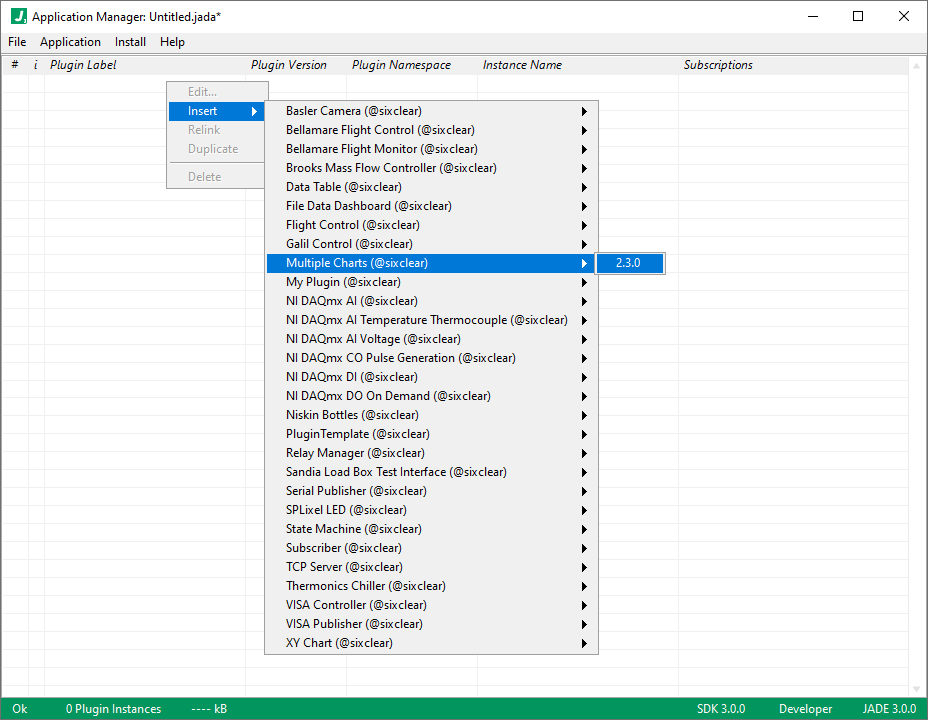
As shown below, we add plugin instnaces by simply right-clicking and selecting a plugin from the Insert... menu.
Below we show several plugin instances added to an application. In the title bar, notice that this application has also been saved as Exmaple.jada.
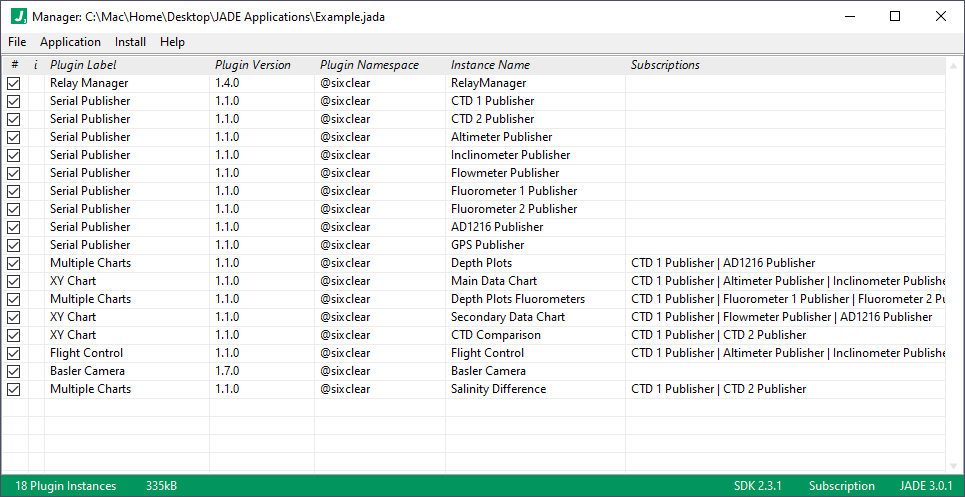
Generally we may add as many plugin instances to our application as desired. We can even use multiple versions of the same plugin in the same application. Let’s take a look at the columns we see.
Column Headers
In this section we break down the meaning and utility of the column headers in the Application Manager.
# (Checkboxes)
The # column, the first column, is where we can select the plugins to run initially when the application is run. All plugins will be loaded when the application runs, however only those selected will be launched and run initially. Any unselected plugins can later be run either manually or by sending a message to the JADE Supervisor.
i (Information)
This column shows warnings detected at the plugin instance level. For example, if you open a JADA file with plugin instances corresponding to plugins which aren’t yet installed locally on the computer running JADE, you’ll see a corresponding warning. Entries in this column will display with a yellow or red background depending on the severity of the warning, and provide an explanation when hovering. Generally, red indicates the plugin instance cannot run (ex. plugin not installed), while yellow indicates other problems (ex. duplicate instance name). An example is shown below.

As noted in the warning message for the missing plugin, such warnings do not always prevent running an application in general, however they may prevent running a plugin instance for which an warning or error is present.
Plugin Label, Plugin Version, and Plugin Namespace
The next three columns display information about the kind of plugin associated with the instance:
Plugin Label- a human-friendly name for the kind of pluginPlugin Version- the version of the pluginPlugin Namespace- the organization, team, or individual that created the plugin
Instance Name
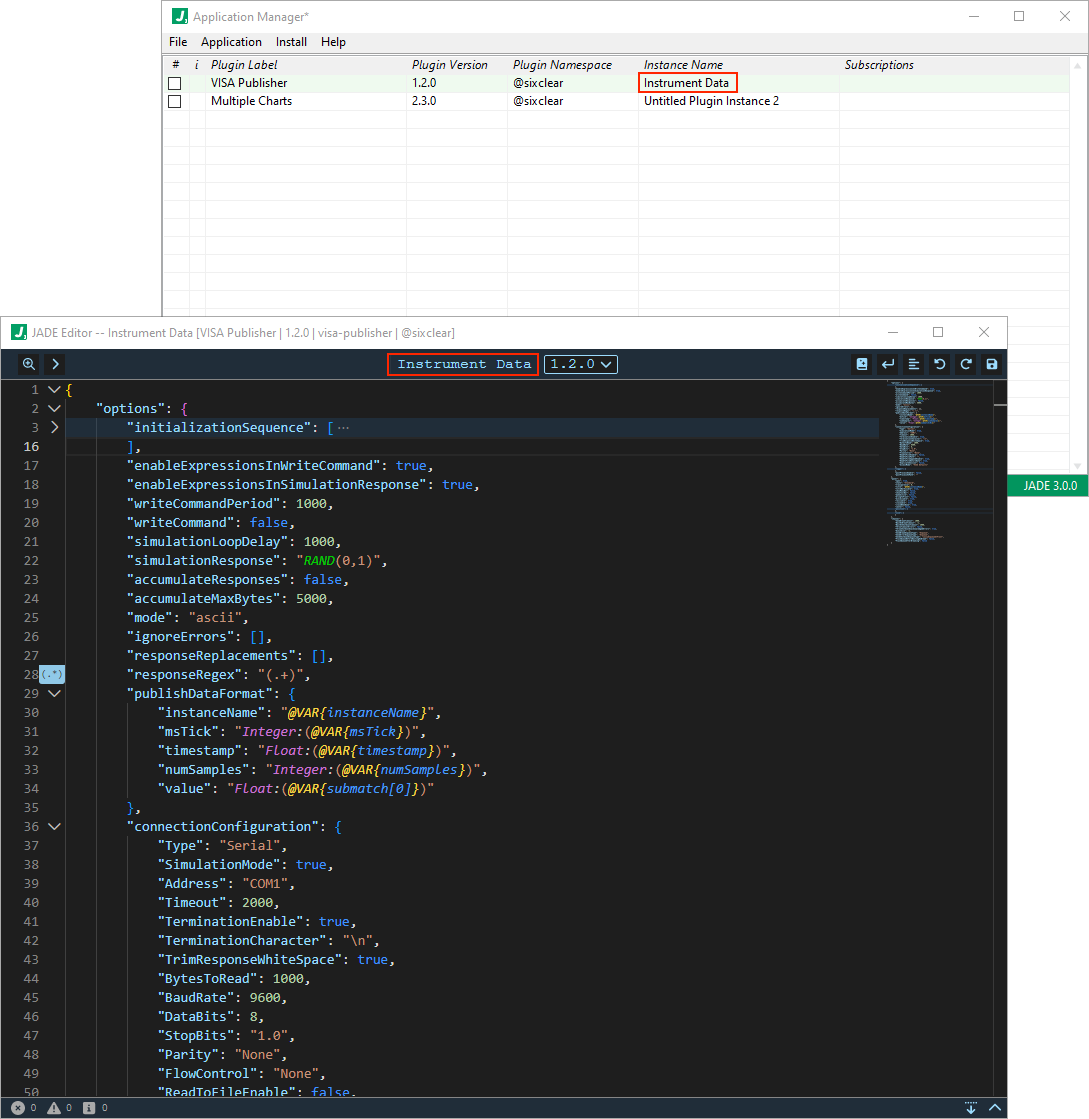
This column displays the unique name of the plugin instance in the application, which is editable in a Plugin Editor window where plugin configurations are edited. We show highlights below where the Instance Name is edited.
Subscriptions
This column displays the instance names of the plugin instances in the application which subscribe to the plugin instance in a given row. Subscriptions are specified in the SubscribesTo key of plugin instance configurations. Below we show a plugin instance configuration highlighting the SubscribesTo element.
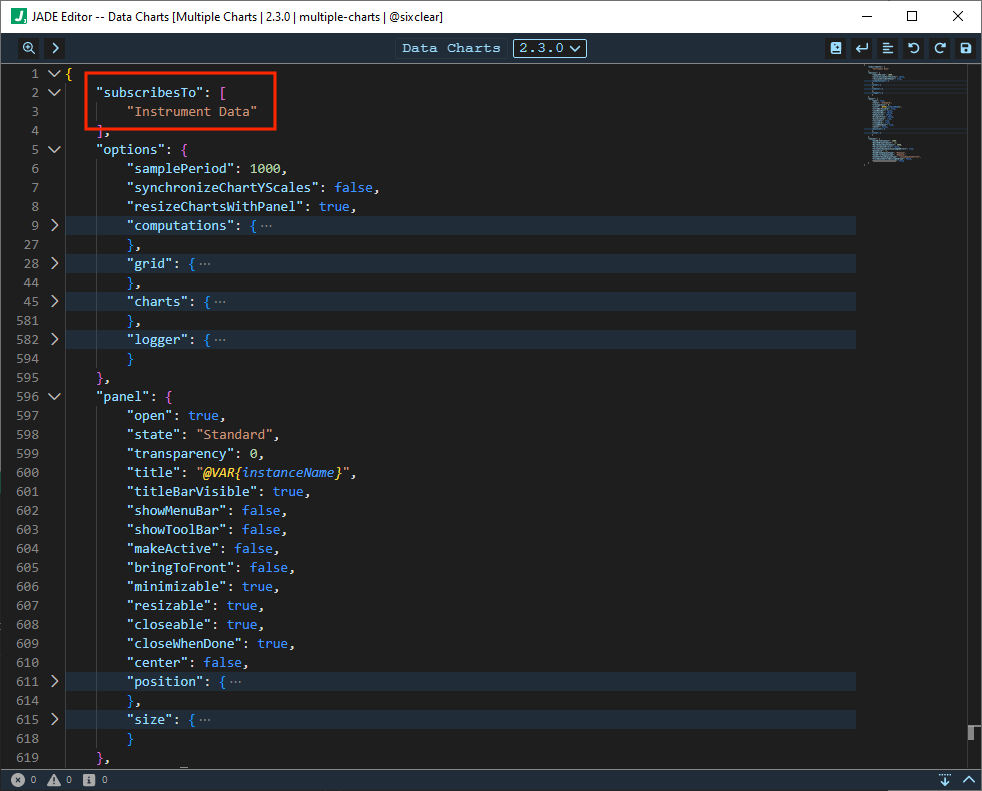
In this case, the Data Table plugin instance subscribes to a plugin instance named Instrument Data, so that it receives copies of any data published by the Instrument Data plugin instance. Of course, the `Data Table plugin instance could have subscribed to any number of plugin instances. Check out the Plugin Communication for more information on how plugins communicate.
Right-click Context Menu Options
Several actions may be taken when right-clicking in the Application Manager. For exmaple, you may right-click on any row to insert a plugin. Below we show the menu when right-clicking on a plugin instance.
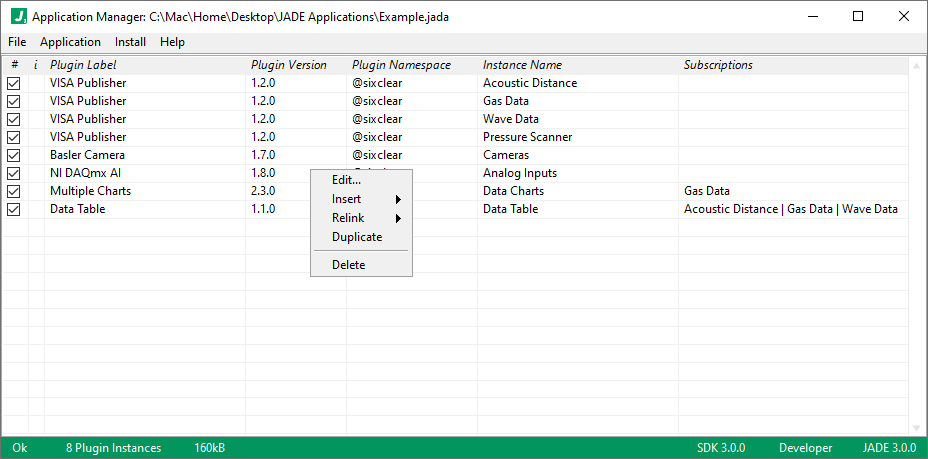
Let’s break down each menu option below.
Edit...- opens an Editor instance to configure the targeted plugin instanceInsert- shows the list of available plugins and inserts a plugin instance upon selectionRelink- links the targeted plugin instance to the selected plugin (but does not change the plugin instance configuration)Duplicate- duplicates the targeted plugin instanceDelete- deletes the targeted plugin instance
Main Menu Options
The Application Manager’s menu bar has 4 top level entries: File, Application, Install, and Help.
File Menu
The File menu has several options for managing files, accessing preferences, and performing other core operations in JADE.

-
File >> New- clears the view and starts a new JADE application (JADA file, *.jada) and will prompt to save if there are unsaved changes in the currently open application -
File >> New Window- opens a new Application Manager window. Use this option to open and work on multiple JADE applications simultaneously. -
File >> New Plugin Development Project- creates a new JADE plugin development project, or JADE DEVKIT project for short, in the user-selected location on the file system. This includes a LabVIEW project (*.lvproj) which links to plugin templates, the JADE SDK (100s of functions not found in LabVIEW natively to help with development), and more. -
File >> Open- opens a selected JADE application (JADA file, *.jada) from the file system. You can also simply double-click on a JADA file to open it from the file system. -
File >> Merge...- opens a selected JADE application (JADA file, *.jada) from the file system and adds all plugin instances in the selected JADA file to the currently open JADA file -
File >> Save- saves the current JADE application (JADA file, *.jada) -
File >> Save As...- prompts to user for a file name and location at which to save the JADE application (JADA file, *.jada). Use this to save a copy or modified version of a JADE application while leaving the original application intact. -
File >> Open Welcome Guide...- opens the Welcome Guide experience. This is the window which displays after launching JADE for the first time after installation and gives a brief overview of JADE with links to documentation. -
File >> Preferences...- opens the Preferences Editor where environmental preferences may be changed -
File >> Close- closes the Application Manager window and (if open) any Plugin Configuration Editor windows and the Install Manager window. Notably, this will not close running applications; Appilcation Supervisor windows and any associated plugin instances will remain running.
Application Menu
The Application menu is where JADE applications are manually launched / run.

Application >> Run Application- runs the currently open JADE application (JADA file, *.jada)
Install Menu
The Install menu is where the Install Manager, activation window, and other installation related operations are found.

-
Install >> Install Manager...- opens the Install Manager window, which allows managing installed plugins, dependencies, examples, SDK instances, and DEVKIT instances. -
Install >> Activate...- opens the Install Manager window, which allows managing installed plugins, dependencies, examples, JADE SDK instances, and JADE DEVKIT instances. -
Install >> SDK Version- this option displays a flyout menu with installed versions of the JADE SDK. The JADE SDK is a collection of core functions available to plugins. There are two imprints of the selected JADE SDK in play at any time: a deployment instance used for running plugins and a development instance used with JADE DEVKIT. -
Install >> Refresh Asset Stores- refreshes the JADE cache of installed assets (plugins, dependencies, examples, SDKs, and DEVKITs). Note that JADE refreshes this cache automatically when new assets are installed (via a JADE Bundle, *.jadb) or uninstalled with the Install Manager. Use this menu option after building a plugin using JADE DEVKIT to make that plugin available/insertable in JADE.
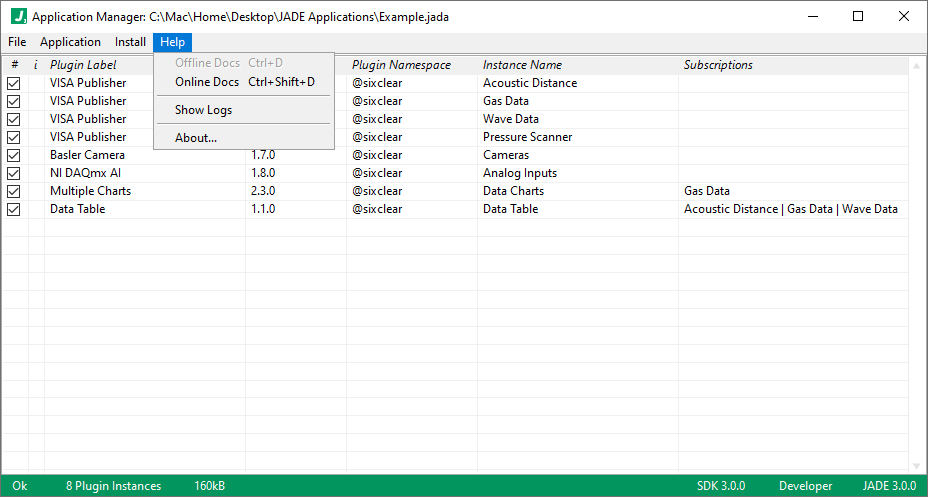
Help Menu
The Help menu contains items to open JADE documentation, show JADE system level logs, and display more information about JADE.
-
Help >> Online Docs- opens the overview / landing page for JADE Docs online -
Help >> Show Logs- shows the JADE system logs generated by the Application Manager, Application Supervisor, and Install Manager. Generally these logs are only interesting when the status in the lower left corner of the window’s footer displays status:Error. Notably, most of these errors are non-catastrophic and may simply be informative.