Page Summary
On this page we cover the role, features, and functionality of JADE DEVKIT.
JADE DEVKIT
The JADE DEVKIT, is a set of tools for creating custom plugins which integrates directly into the LabVIEW project environment.
Which LabVIEW Versions Are Supported
In effort to make JADE accessible to across the LabVIEW ecosystem (and with many organizations still on older versions of LabVIEW for various reasons), JADE takes an approach which supports LabVIEW 2019 and LabVIEW 2024 Q3 or later. This may sound crazy, but it’s made possible by a new feature introduced in LabVIEW 2024 Q3. The end result is that JADE DEVKIT is currently compiled for LabVIEW 2019 but can also be used when developing in LabVIEW 2024 Q3 or later. We will explain the reasons for releasing JADE DEVKIT in LabVIEW version 2019 - and the noted LabVIEW 2024 Q3 feature, in more detail below.
Why is LabVIEW 2019 supported?
LabVIEW 2019 was one of the last versions of LabVIEW prior to the switch to subscription licensing of LabVIEW (which for the record, is likely the more sustainable model for both NI and its customers, including Sixclear, not to mention is provides access to all versions of LabVIEW which can be quite helpful at times :). As a result, some organizations have maintained their codebase in LabIVEW 2019 until deciding to make the leap and port to the latest version. This leaned us towards implementating JADE DEVKIT in LabVIEW 2019.
How are later versions of LabVIEW supported?
We of course wanted to support versions beyond LabVIEW 2019, and in particular always want to support the latest version of LabVIEW. Fortunately, as of LabVIEW 2024 Q3, you may target or “develop in” previous versions of LabVIEW by modifying the Save version setting from the Project Proerties dialog.
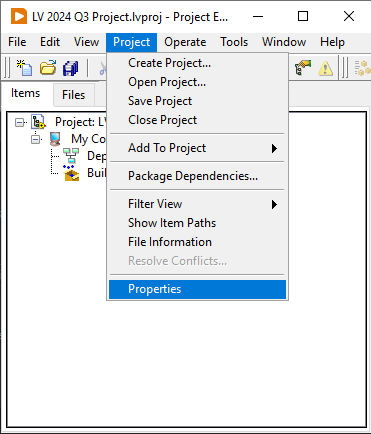
Open the Project Properties dialog by selecting Project >> Properties from the LabVIEW Project (in LabVIEW 2024 Q3 or later):
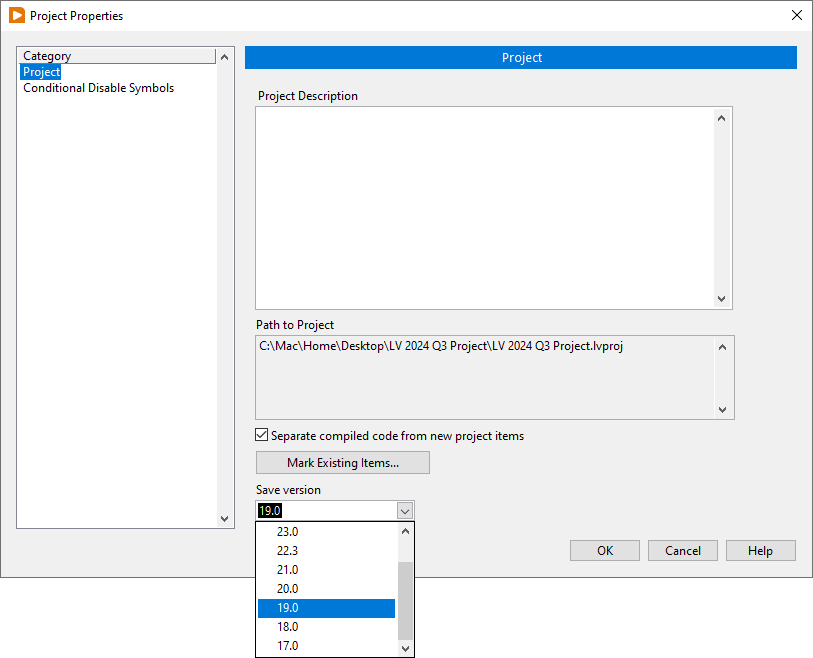
Then you may change the target Save version to version 19.0 which means “LabVIEW 2019” as shown below:
This approach allows you to develop LabVIEW 2019-compatible code while in working in LabVIEW 2024 Q3. This feature will be available for future versions of LabVIEW, and as a result JADE DEVKIT supports LabVIEW 2019 and LabVIEW 2024 Q3 or later.
Creating New DEVKIT Projects
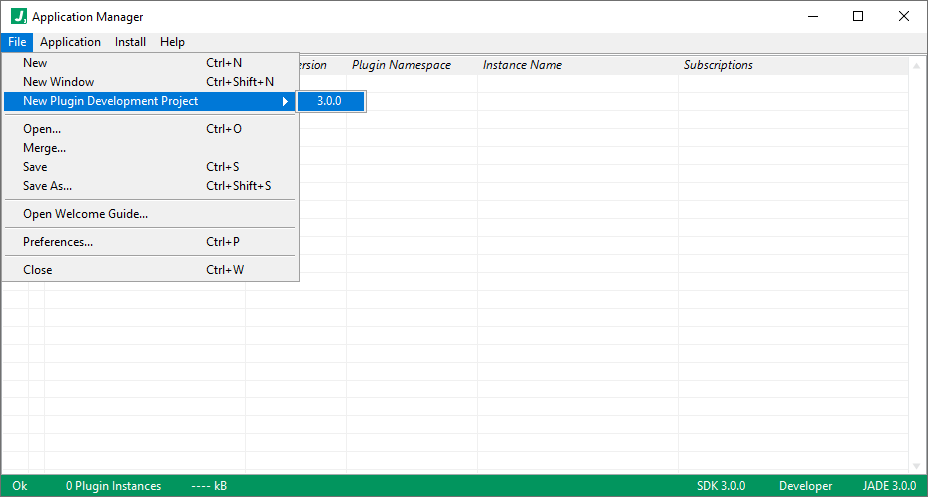
To create a new plugin development project, open JADE and choose menu option File >> New Plugin Development Project...:
This will prompt for a directory in which to store a new DEKVIT project, a LabVIEW project (*.lvproj) along with all of the resources needed to create JADE plugins. We choose to store it in a folder on the desktop named my-devkit-project for the purposes of this documentation, and will refer to it there below.
When the new DEVKIT project has been created, JADE will open a File Explorer instance showing that directory to show the contents of the new DEVKIT project:

Creating New Plugins
In JADE, we rarely start from scratch and plugin creation is no exception. While it is possible to start from scratch, we typically duplicate the plugin template instead. The plugin template implements the core plugin surface area to interact with JADE and many of the features commonly associated with plugins, such as publishing data and handling messages received from other plugins.
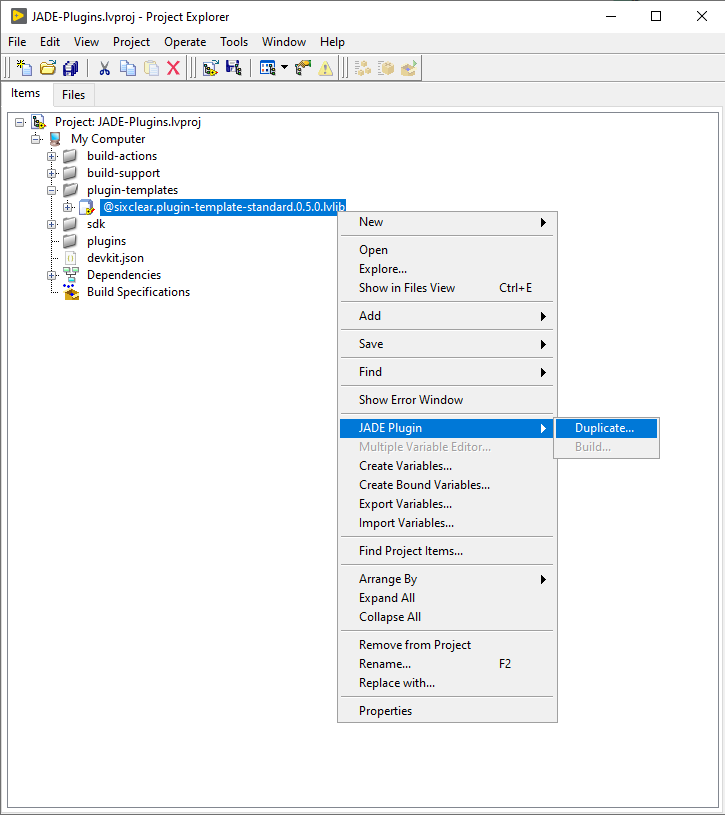
Below we show how to duplicate the plugin template to create a new plugin:
This will open a window which requests information about your plugin (namespace, type, and version):
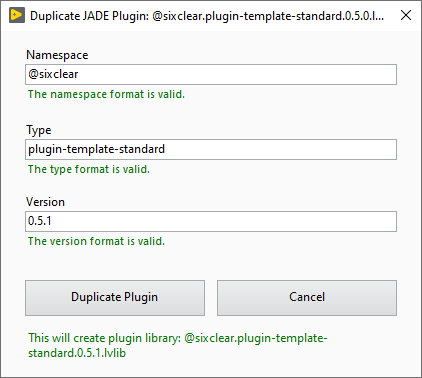
By default it simply duplicates the Namespace and Type, and increments the patch Version, however you may change those fields to anything you like. Notably, the fields are syntax-checked and must conform to some basic format requirements.
To continue, let’s give the new plugin a Namespace @my-company, Type my-plugin, and Version 1.0.0 as shown below:
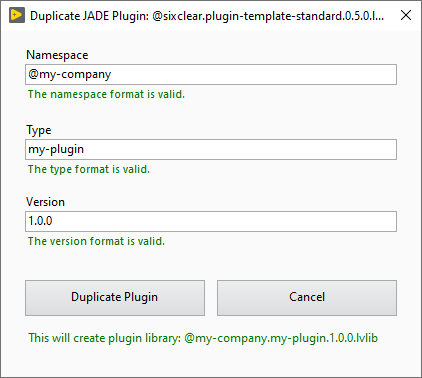
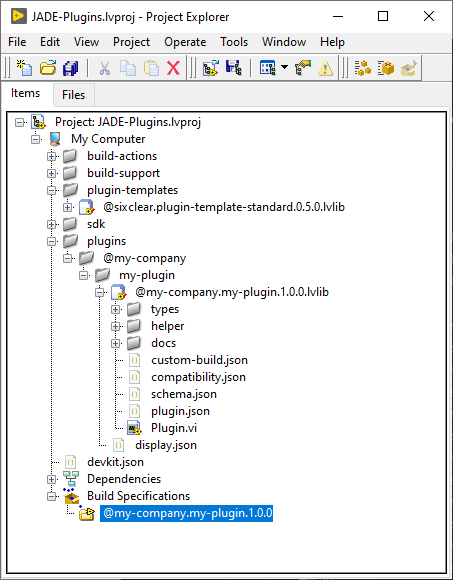
After clicking the Duplicate Plugin button, a new plugin named @my-company.my-plugin.1.0.0.lvlib will be populated in the project under the virtual folder hierarchy plugins >> @my-company >> my-plugin:
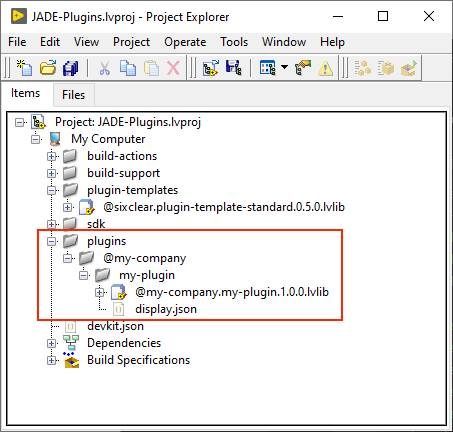
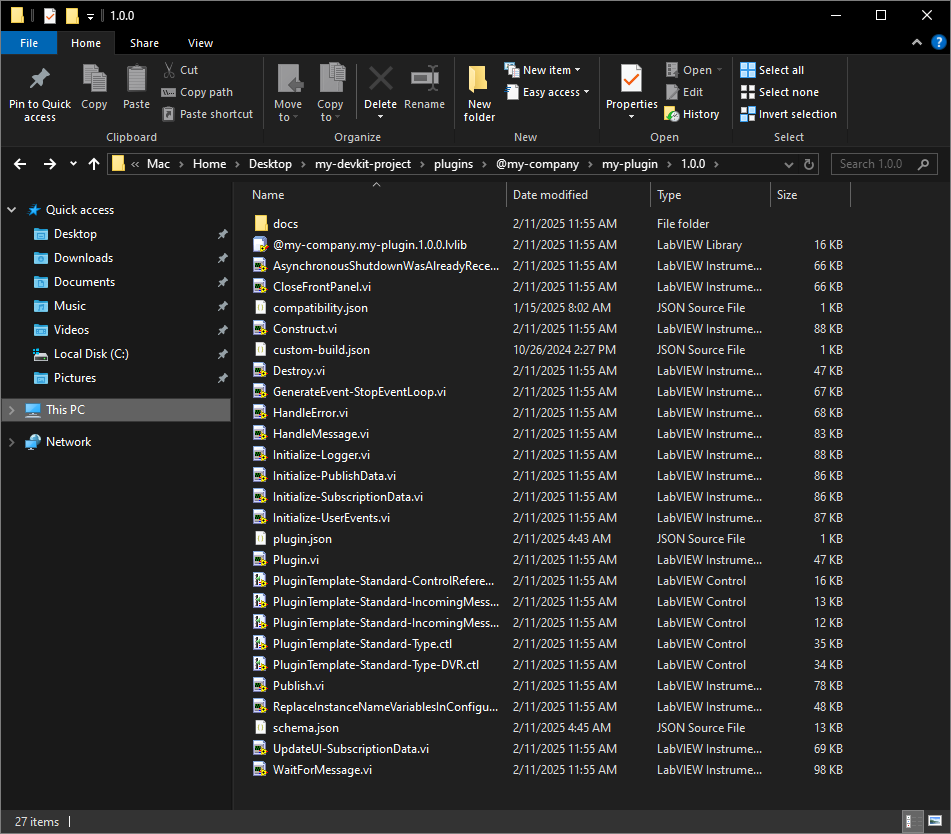
This hierarchy is also reflected on disk and must be maintained for plugins. Having created this DEVKIT project on the desktop under a my-devkit-project folder, the following folder / hierarchy now exists on disk (note: we use <Your Desktop> to refer to the desktop below):
<Your Desktop>\my-devkit-project\plugins\@my-company\my-plugin\1.0.0
Below we see this plugin version folder and its contents:
Turning back to the LabVIEW project window, notice that a Build Specification was also created. In most cases we need not interact with this directly, but we show it below (selected / highlighted in blue) for completion:
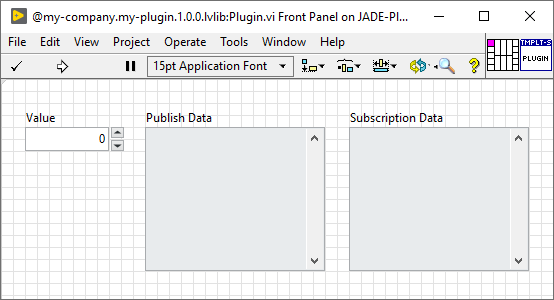
The new plugin’s top level VI front panel (Plugin.vi) will also be open when duplication completes. It is simply be design and intended to be modified to the needs of your plugin interface. We show it below for completion (we discuss the Plugin.vi in more detail below):
Plugin Contents
First, notice that plugins are wrapped in Libraries (LVLIB files, *.lvlib) and are fully canonically named (in our case: @my-company.my-plugin.1.0.0.lvlib). This is to minimize the risk of naming collisions and, in particular, the inclusion of the version number in the LVLIB name allows multiple versions of the same plugin to run simultaneously.
Expanding the LVLIB shows the contents of the new plugin:
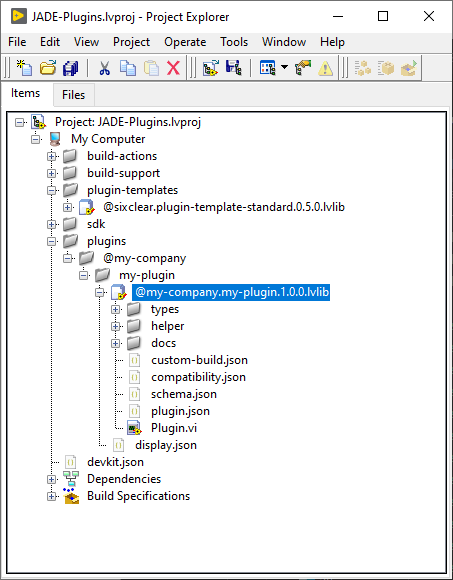
There are several key things to note about plugin contents:
-
the
typesandhelpervirtual folders are NOT special, but are a common way to contain types and helper functions created for your plugin. These folders do not correspond to actual folders on disk. -
the
docsvirtual folder IS special. This is where we will put docs content which is carried along with your plugin on deployment and integrates into JADE. This folder does correspond to a folder on disk. -
custom-build.json- a JSON file which defines custom build steps for the plugin. This feature is will be discussed in detail later and usually remains untouched for most plugins (custom build steps are rarely needed, but supported). -
compatibility.json- a JSON file declaring the compatible versions of JADE, SDK, and any dependencies. -
schema.json- a JSON file containing a description of the plugin configuration data type (supported options). This file conforms to the JSON Schema standard. -
plugin.json- a JSON file containing the entry point for the plugin (the name of the top-level VI for the plugin). If the top-level VI is ever moved into a subfolder (not recommended) use a relative path to define the entry point (relative to theplugin.jsonfile). -
Plugin.vi- the plugin’s default, top-level VI. If this VI is renamed or moved, theplugin.jsonfile’sentryPointmust be updatd accordingly. -
display.json- a JSON file defining the plugin’s display information includinglabelandsummaryfields. For Sixclear plugins these fields are used to populate information in the Online Bundler. Support for 3rd party namespaces is planned so developers are highly encouraged to populate this file.
Plugin.vi Contents
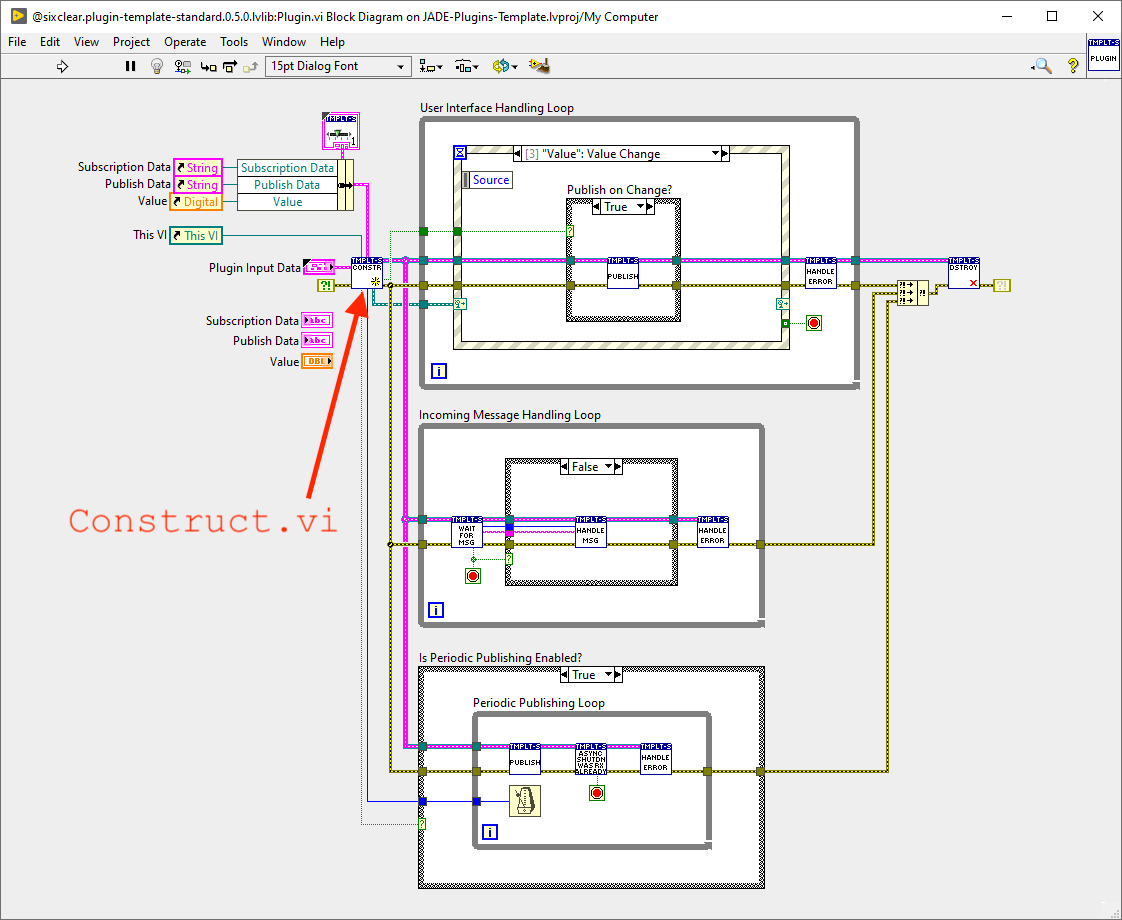
Plugin.vi has a simple user interface and is intended to be updated according to the needs of the new plugin:
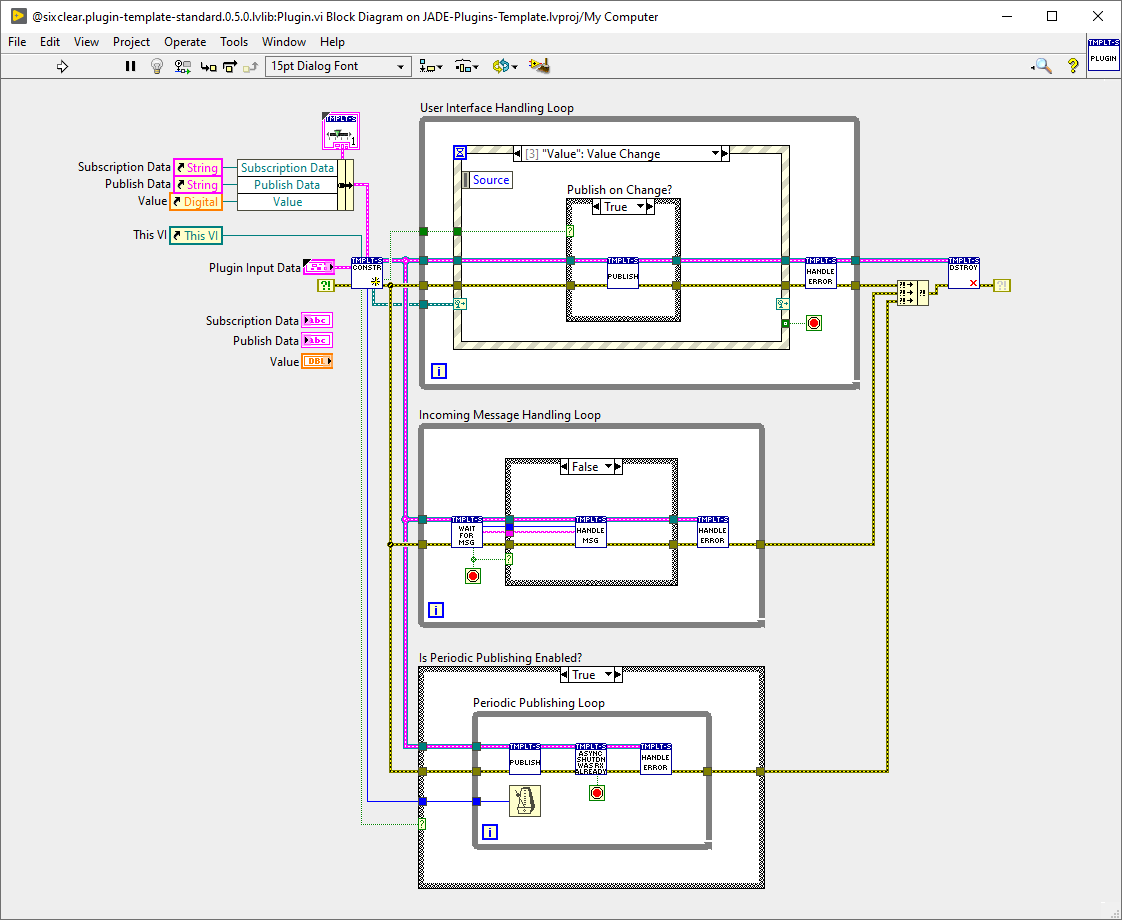
Opening it’s block diagram, we observe that it implements a user interface handling loop, an incoming message handling loop, and a periodic publishing loop. We also show how to send messages on demandin the “Value: Value Change” event case of the Event Structure in the User Interface Handling Loop.
Construct.vi Contents
The first function / subVI to execute in Plugin.vi is Construct.vi. Key inputs to Construct.vi are a cluster of front panel control references (a common, recommended pattern), a reference to the Plugin.vi itself, and Plugin Input Data which is received by the Application Supervisor which launches the plugin.
We needn’t delve too deeply into what’s inside the Plugin Input Data, however this is where the plugin receives information such as it’s communication channel(s) and the instance configuration. Looking inside the construct VI, we see that the first function returns the plugin instance configuration as a JSON string, and is subsequently deserialized it into hardened data types:
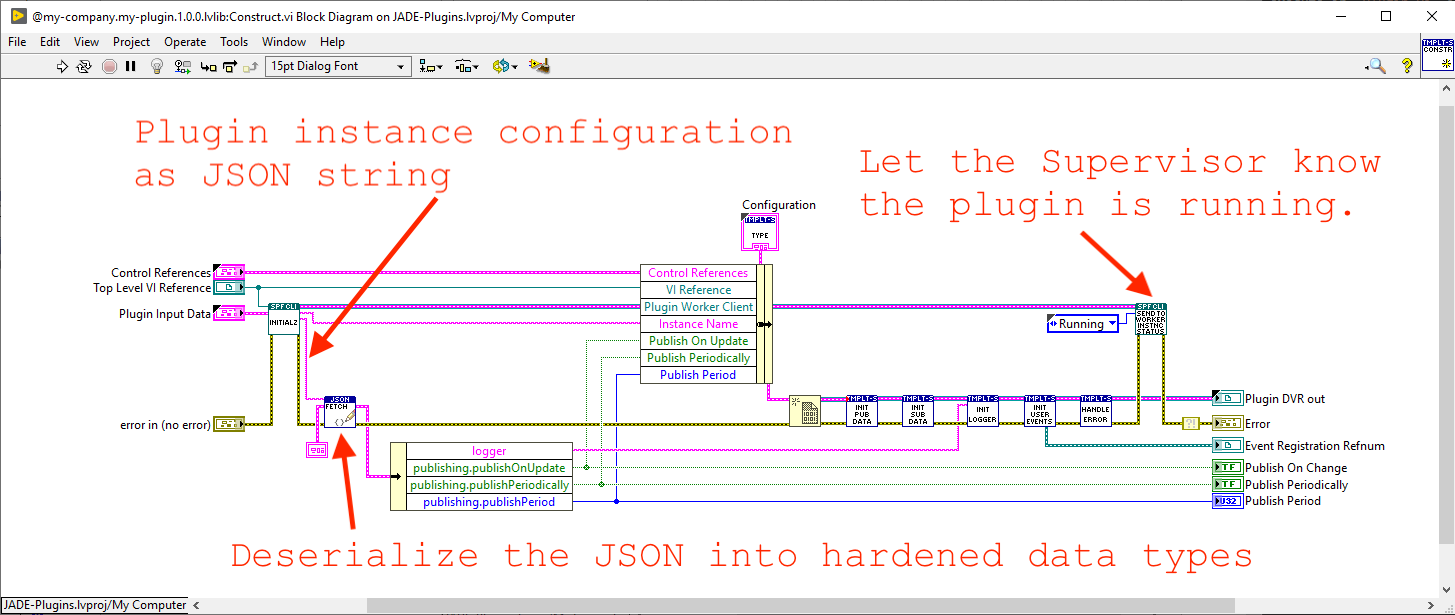
At the end, we simply let the Supervisor know tha that the plugin is running. This is the core pattern for plugins to receive user configuration and effect the intended behavior. You’ll find the same function in the Destroy.vi, only instead of updating the status to Running, it updates the status to Stopped.
Additional Plugin Development Considerations
In general, you’re just writing LabVIEW code, but you may not want all of the features from the template in your plugin. For example, your plugin may not need to handle incoming messages, in which case you can simply delete the Incomoing Message Handling Loop. Similarly, if your plugin needn’t peridically publish data, you can delete the Periodic Publishing Loop. On the other hand, if either of those features is useful for your plugin, we have already provided nice wrapper VIs in Handle Message.vi and Publish.vi which you can open and update to implement your desired behavior. In the end, again, you’re now just writing LabVIEW code.
plugin.json File
This file simply contains the entryPoint configuration.
{
    "entryPoint": "Plugin.vi"
}
This will likely never need to change unless you make changes to the location or name of Plugin.vi. If you do make changes, be sure to update the entryPoint configuration accordingly. Note that if the location changes, specify the location of the top-level entry point VI with a relative path (relative to the plugin.json file).
compatibility.json File
This file is where we specify the dependencies of our plugin. In general plugins are dependent upon the JADE version, SDK version, and any dependencies they may require. Many plugins will be compatible with multiple versions of JADE, SDK, and even dependencies. Compatibility is specified using semver range syntax.
Below are the compatibility.json default contents:
{
    "compatibleJADEVersions": ">=3.0.0",
    "compatibleSDKVersions": ">=3.0.0",
    "dependencies": []
}
If we had a dependency, such as NI-VISA, then the file might look like:
{
    "compatibleJADEVersions": ">=3.0.0",
    "compatibleSDKVersions": ">=3.0.0",
    "dependencies": [
        {
            "type": "@sixclear/ni-visa-runtime",
            "compatibleVersions": ">=19.5.0",
            "kind": "managed"
        }
    ]
}
The kind field here equaling managed indicates that the dependency is a managed, bundle-able asset.
schema.json File
The schema.json holds the definition of the allowed type for the plugin instance configuration. This file is key to guiding the user of a plugin by providing syntax checking, hover descritions, and more.
{
    "type": "object",
    "description": "This top level object holds all configuration information for this plugin.",
    "required": ["options", "panel", "channel"],
    "properties": {
        "subscribesTo": {
            // ... see file for details ...
        },
        "options": {
            "type": "object",
            "description": "Configuration options specific to this plugin.  Note that variables and expressions are generally allowed in this section.",
            "required": ["publishing", "logger"],
            "properties": {
                "publishing": {
                    "type": "object",
                    "description": "An object defining the plugin's publishing behavior..",
                    "required": ["publishOnUpdate", "publishPeriodically", "publishPeriod"],
                    "properties": {
                        "publishOnUpdate": { "type": "boolean", "default": false, "description": "Whether to publish data when the value changes." },
                        "publishPeriodically": { "type": "boolean", "default": false, "description": "Whether to publish data periodically." },
                        "publishPeriod": { "type": "integer", "default": 2000, "description": "The period with which to publish.  Only applies if publishPeriodically is true." }
                    },
                    "additionalProperties": false
                },
                "logger": {
                    // ... see file for details ...
                }
            },
            "additionalProperties": false
        },
        "panel": {
            // ... see file for details ...
         },
        "channel": {
            // ... see file for details ...
        },
            "additionalProperties": false
        }
    },
    "additionalProperties": false
For more details on how to define this file, see the JSON Schema documentation.
custom-builds.json File
The custom-builds.json is a json file with just a single element customBuildSteps whose value is an array of VI relative paths (relative to the custom-builds.json file) which are executed as a step in the plugin build process. This allows for doing any custom work on the build imprint just after the core build operations complete.
{
    "customBuildSteps": [] // custom build step VI relative paths go in this array
}
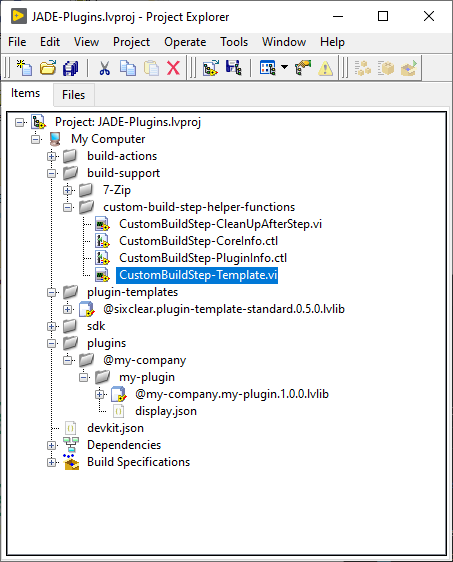
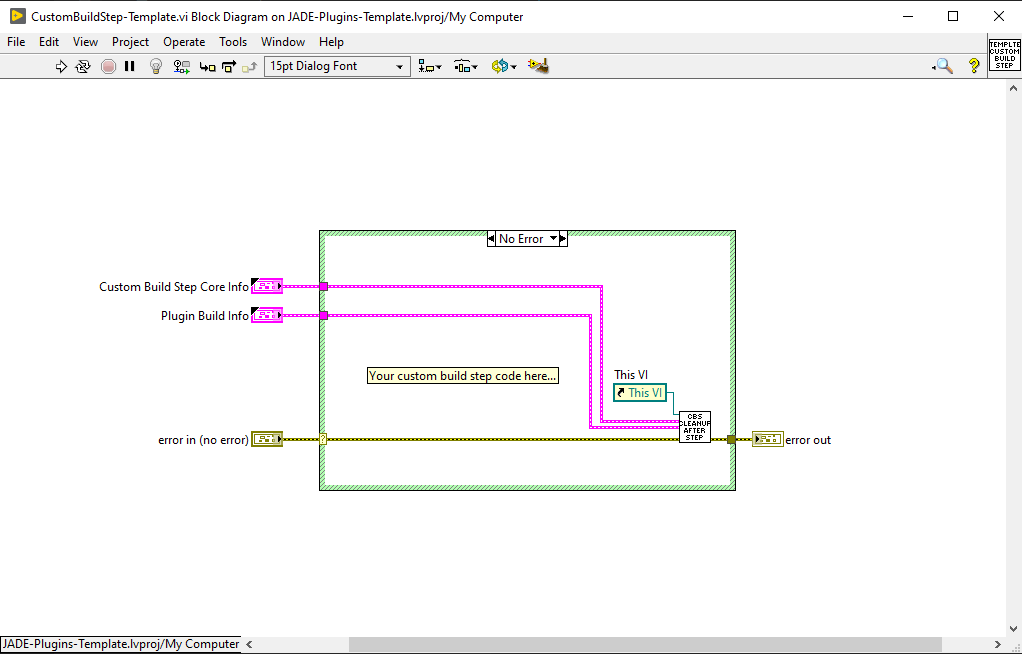
In the build-support virtual folder there is a CustomBuildStep-Template.vi which should copied as a starting point for new custom build steps, as shown selected (blue highlight) below:
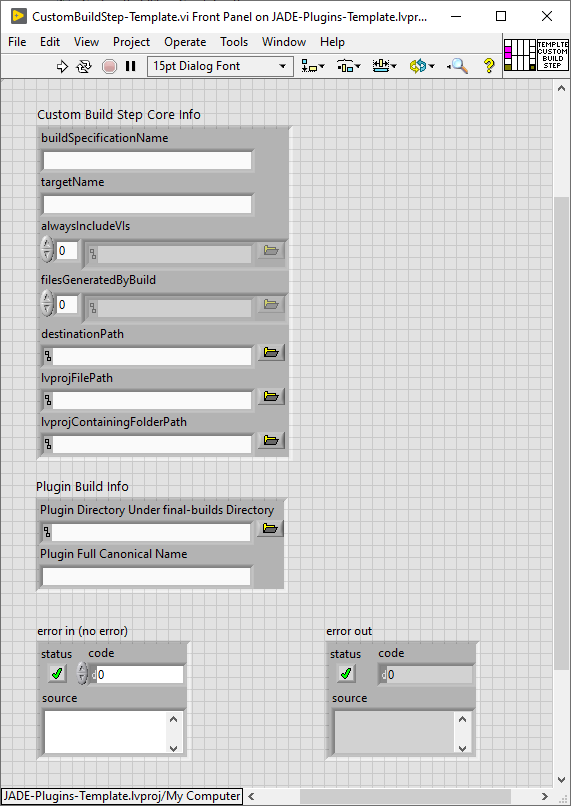
Below we show the front panel which details the information passed to custom build steps:
And block diagram seeds the implementation by simply catching incoming errors and calling a CustomBuildStep-CleanUpAfterStep.vi (a provided helper function) at the end which should be include as it removes the custom build step VIs from plugin build output:
We discuss building plugins in more detail later, but custom build steps are only needed when building a plugin, not when a plugin is deployed.
display.json File
The display.json file holds plugin Type level information: label and summary. For Sixclear plugins these fields are used to populate information in the Online Bundler. Support for 3rd party namespaces is planned so developers are highly encouraged to populate this file.
{
    "label": "My Plugin",
    "summary": "The My Plugin plugin."
}
Building Custom Plugins
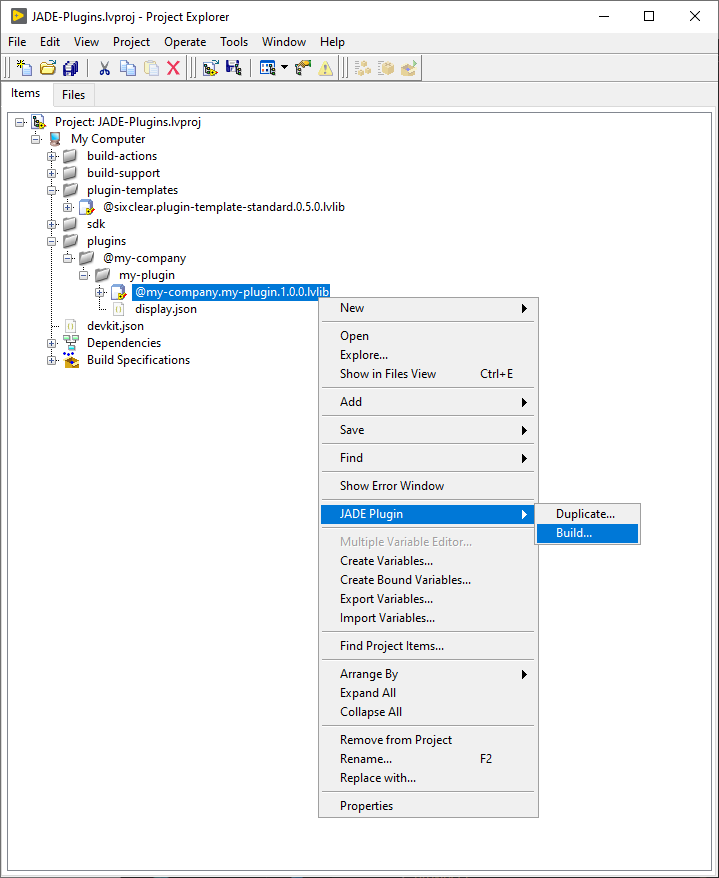
Building a custom plugin is easy. Simply right-click on the plugin LVLIB file and choose “JADE Plugin >> Build…” as shown below:
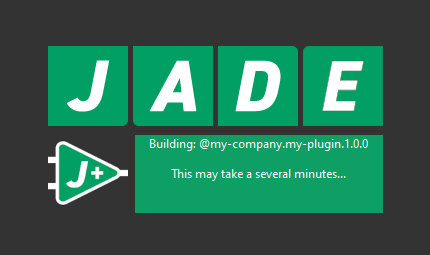
The build process may take several minutes depending on the size of the plugin source code imprint. While building, the following progress dialog will display:
When the bulid is complete, the builds folder in our DEVKIT project directory will look roughly as follows:
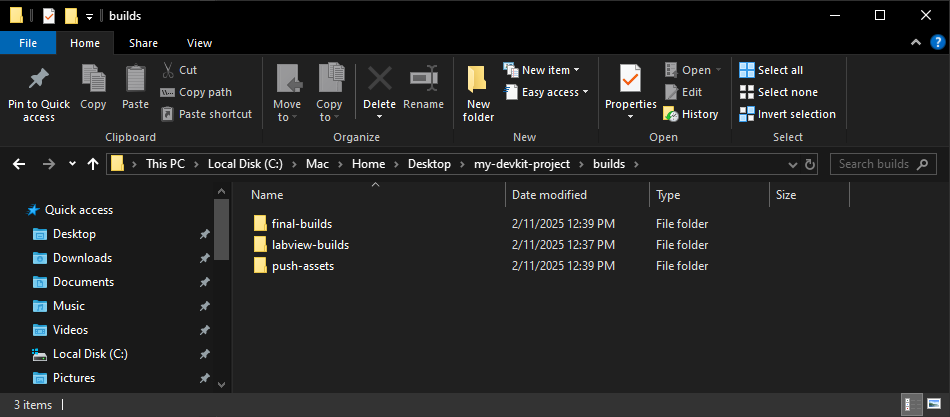
We needn’t touch these assets, but it’s good to maintain the mental model for when and where new file system imprints are created.
Importantly, a copy of the relevant build assets have also been placed into the appropriate JADE installation location. In this case, the following directory now exists:
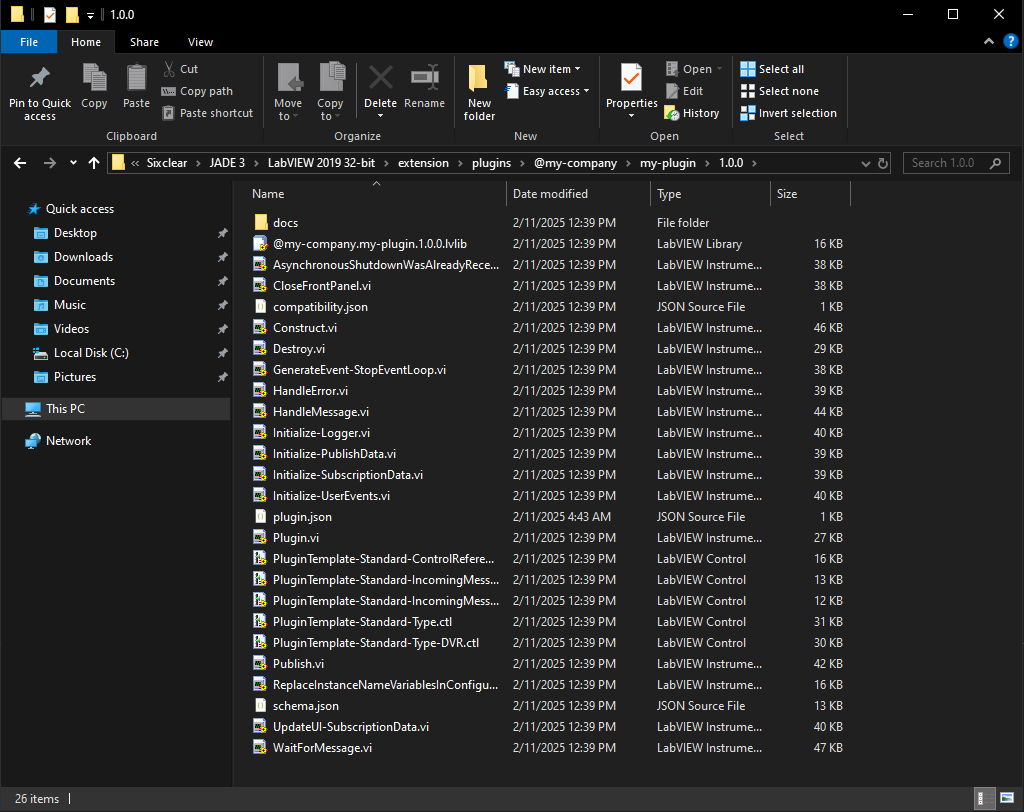
C:\ProgramData\Sixclear\JADE 3\LabVIEW 2019 32-bit\extension\plugins\@my-company\my-plugin\1.0.0.
This imprint makes the plugin available for running and bundling in JADE. Notice the contents look similar to our original DEKVIT plugin version folder (though it has been processed to remove block diagrams and includes other optimizations):
Getting Custom Plugins to Show Up in JADE
There are two places we’d like to see our new, custom plugin show up in JADE: Application Manager (as an available plugin in the Insert menu) and Install Manager (in the list of installed asssets).
Updating the Insert Menu in Application Manager
If Application Manager was open when we build a custom plugin, we can refresh the asset stores in JADE in order to make our custom plugin avaialable in Application Manager. This can be done via the main menu selection Install >> Refresh Asset Stores option as shown below:
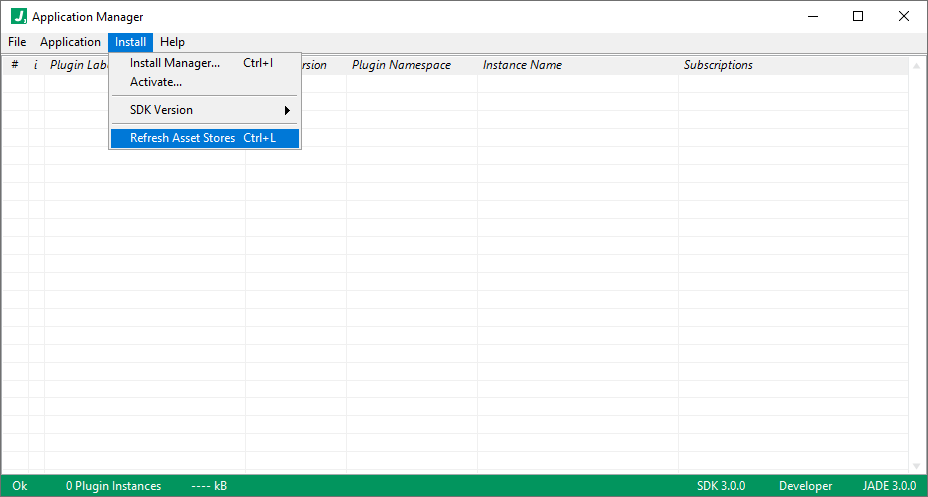
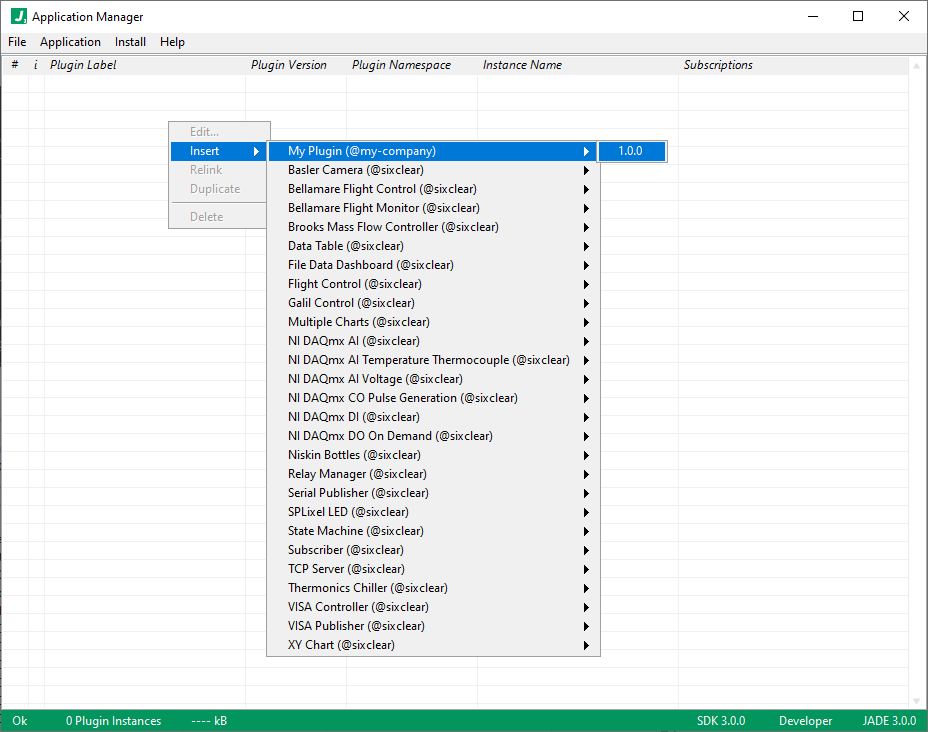
Notably, this may also be done with keyboard shortcut Ctrl + L. Thereafter, our custom plugin is available in the Insert menu alongside the other plugins:
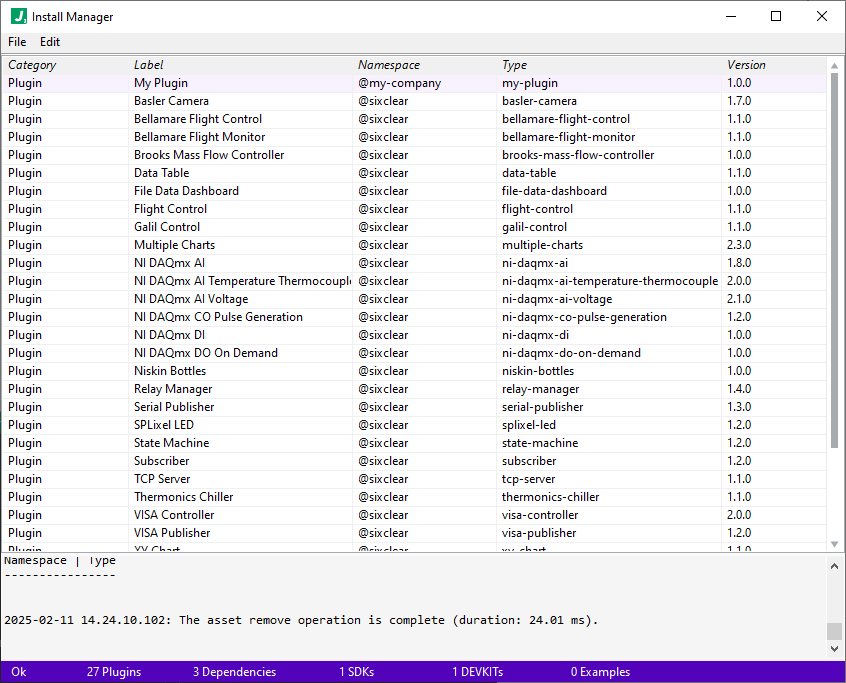
Updating the Asset List in Install Manager (if open at plugin build time)
If Install Manager was open when we build a custom plugin, we can refresh the asset list by choosing Edit >> Refresh List in the menu as shown below:
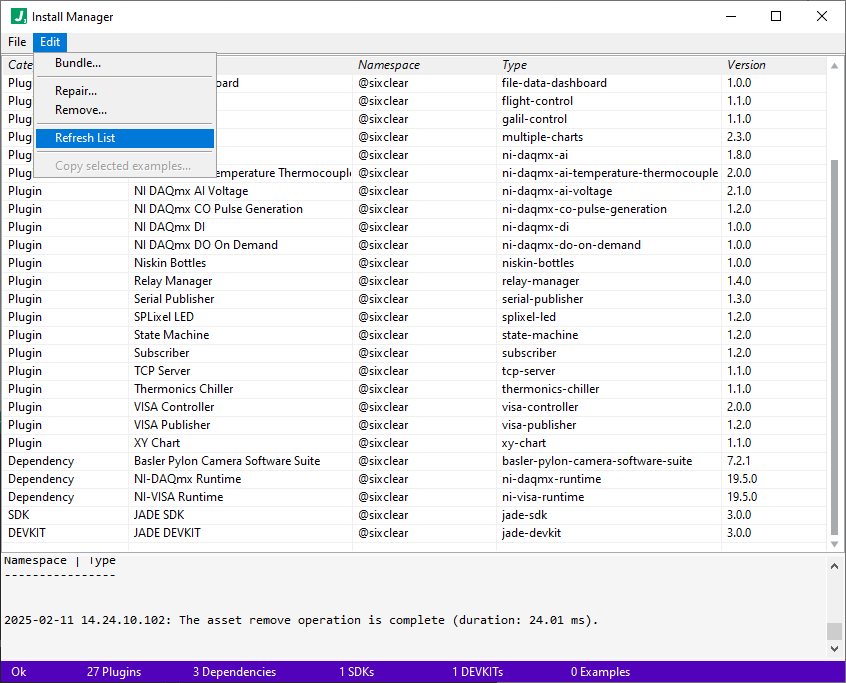
Thereafter, our custom plugin should display in the list:
Closing Remarks
JADE DEVKIT provides the tools needed to build an integrate custom plugins. Plugins can be anything from a simple data publisher to a complete control system. With the full breadth of LabVIEW tooling available for development, this integration allows you to develop essentially any new components / plugins which run alongside and commmunicate with existing plugins.